Friday, 8 September 2017

Setting up your Dynamics 365 Online Portal


Dynamics 365 Online Portal Configuration


1) Go to Dynamics 365 Central Administration Center


2) Click on Application Tab


3) If portal Add – On is not configured it will show as point 2 and click on Portal Add-On and click on Manage button.


    4) It will redirect to “Configure Your Portal” page

Enter name, Portal URL and Select Dynamics 365 Instance


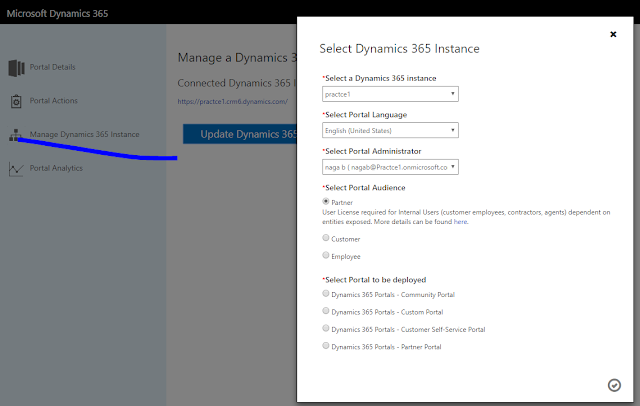
5) Then system will ask for Select Portal language, Portal Audience and Portal to be Deployed. Click on Submit button.


6) Prompt for Terms of Service and click on Accept button.

7) System redirected to below page and click on here after some time.

8) There will be another three left navigation buttons available in Portal Details page


9) Go to Dynamics CRM 365 and go to Settings >> Solutions, we can observe there are three manage solutions installed automatically for self-service portal.


10) There is new tile (Portal) appear in Site Map.


Tuesday, 6 June 2017

Backup and Restore Dynamics 365 Instance


There are two types of backups available in Dynamics 365
1)     System Backups
  • ·        System backups occur daily
  • ·        System backups retained up to 3 days. Check your expiration date
  • ·        System backups do not count against storage limits.
  • ·        System backups are identified as created by System on the Backup & Restore Tab (Manage backups)


2)     On demand Backups
With on demand backups, you can make your own backup before making some significant customization change or applying a version update.

About CRM Managed on demand backups
  • ·        We can back up production and sandbox instances
  • ·        You can only restore to a Sandbox instance. To restore a production instance we need to switch it into a Sandbox instance
  • ·        On demand backups retained for up to 3 days. Check your expiration date.
  • ·        On demand backups are identified as created by some other name other than System and by presence of Edit, Delete and restore options in Details sections. System backups are having only restore option.


How take back up :
  • ·        Below are the steps to take on demand backup.
  • ·        Go to Office 365 and click on Admin tile
  • ·        Go to Administration Centers and click on Dynamics 365


  • ·        Click on Backup & Restore Tab


  • ·        Click on “New Backup” button.


  • ·        Enter backup name in Label and Description in Notes fields. Click on Create button.
  • ·        New backup is available at Manage Backups


Tuesday, 22 November 2016

[Offline plug-in error – CRM 2016] Unable to load plug-in assembly OR Public key token [PUBLIC KEY TOKEN ID] is not found in allow list.

Recently we had an issue when we configure CRM 2016 to Outlook for offline functionality. We got an “Unable to load plug-in assembly” error. 

Root cause: Microsoft applies additional security restriction to registered offline plug-in assemblies. When Microsoft Dynamics 365, Dynamics CRM 2016 or Dynamics CRM Online for Microsoft Office Outlook Access is installed, an AllowList key is added to the system registry on the client computer. For each assembly containing offline plug-in that you register, we must add a registry sub-key under AllowList key with the key name derived from the assembly’s public key token.

Solution:
1)    Get the public key token.
·         Load assembly which contain offline plug-in
·         Select plug-in assembly in tree view of tool.
·         Copy public key token.

2)    Add an AllowList key
·         Open Registry Editor by selecting start, then Run and type regedit.exe
·         In the tree view panel navigate to AllowList key. The complete path of the key is
·         HKEY_CURRENT_USER\Software\Microsoft\MSCRMClient\AllowList.
·         Select AllowList key and right click on it to display the context menu.
·         Select New then click Key to create new sub-key
·         Paste public key token value into the name of the new sub-key
·         Close the registry editor.

Friday, 2 January 2015

Unable to find CRM explorer in Visual Studio 2012

After installing CRM Developer Toolkit

·         Some people are reported unable to connect CRM Explorer when we deploy CRMPackage.

·         Some are reported unable to find CRM Explorer in Visual Studio 2012.

·         Some are reported there is no option to connect CRM Server under Tools in Visual Studio 2012.

·         The most common reason for failure is CRM Organisation has not set properly when creating the project.

·         The problem seems to be there is a missing section in the Visual Studio solution file. Follow the below steps to fix the issue.

1)    Close the Visual Studio Project
2)    Open Visual Studio Solution file in a text editor like notepad or Notepad++
3)    Find the Global section and insert the block highlighted with BOLD
Global
                GlobalSection(CRMSolutionProperties) = preSolution
                                SolutionIsBoundToCRM = True
                EndGlobalSection
                GlobalSection(SolutionConfigurationPlatforms) = preSolution
                                Debug|Any CPU = Debug|Any CPU
                                Release|Any CPU = Release|Any CPU
                EndGlobalSection
               
                GlobalSection(SolutionProperties) = preSolution
                                HideSolutionNode = FALSE
                EndGlobalSection
EndGlobal

4)    Save the file and Open Visual Studio Project
5)    I f all has gone to normal, the connect to CRM Server will now pop up and ask you to connect to your CRM Organisation.

Monday, 1 December 2014

Microsoft Dynamics CRM Build numbers


CRM 2015 builds numbers.

Build Number
KB
Release Date
Description
7.0.0.3543
-
17 Nov 2014
RTM

CRM 2013 Online build numbers.

Build Number
KB
Release Date
Description
6.0.0.809
-
30 Sep 2013
Online Fall '13
6.0.0.1018

Dec 2013

6.0.1.0061

Dec  2013

6.0.1.462
24 Jan 2014
Update 2
6.0.2.43

Feb 2014

6.1.0.575

May 2014
Spring '14
6.1.0.1043
June 2014
Update 3
6.1.0.1214
Sep 2014
Update 4
6.1.1.1521
Sep 2014
Update 5
6.1.1.1610
Oct 2014
Update 6


CRM 2013 On - Premise build numbers.

Build Number
KB
Release Date
Description
6.0.0000.0514
-
RC
6.0.0000.0809
-
RTM
6.0.0001.0061
16 Dec 2013
6.0.0002.0046
22 Mar 2014
6.0.0003.0106
15 Jul 2014
6.1.0000.0581
28 May 2014
6.1.1.132
23 Sep 2014


CRM 2011 build numbers.

Build Number
KB
Release Date
Description
5.0.9688.53
-
30 Jan 2011
RC
5.0.9688.583
-
22 Feb 2011
RTM
5.0.9688.1045
04 Apr 2011
5.0.9688.1155
02 Jun 2011
5.0.9688.1244
28 Jul 2011
5.0.9688.1450
22 Sep 2011
5.0.9688.1533
08 Nov 2011
5.0.9690.1992
12 Jan 2012
5.0.9690.2165
22 Mar 2012
5.0.9690.2243
03 May 2012
-
-
Cancelled
Update Rollup 9
5.0. 9690.2730
16 Aug 2012
5.0.9690.2835
11 Oct 2012
5.0.9690.2838 (Client)
5.0.9690.2839 (Server)
11 Oct 2012
5.0.9690.2903
26 Jul 2013
5.0.9690.3233 (Client)
5.0.9690.3236 (Server)
29 Jan 2013
5.0.9690.3438
26 Mar 2013
5.0.9690.3557
11 Jul 2013
5.0.9690.3731
5.0.9690.3739
(Outlook client only)
07 Oct 2013
5.0.9690.3911
22 Jan 2014
5.0.9690.4150
08 Mar 2014
5.0.9690.4376
24 Sep 2014


CRM 4.0 build numbers.

Build Number
KB
Release Date
Description
4.0.7333.3
-
19 Dec 2007
RTM
4.0.7333.1113
24 Nov 2008
4.0.7333.1312 or
4.0.7333.1316
15 Jan 2009
08 Feb 2009
4.0.7333.1408
12 Mar 2009
4.0.7333.1551
07 May 2009
4.0.7333.1644 or
4.0.7333.1645
02 Jul 2009
4.0.7333.1750
26 Aug 2009
4.0.7333.2138
05 Nov 2009
4.0.7333.2542
17 Dec 2009
4.0.7333.2644
11 Feb 2010
5.0. 9690.2730
08 Apr 2010
4.0.7333.2861 or
4.0.7333.2862
03 Jun 2010
4.0.7333.2935
29 Jul 2010
4.0.7333.3018
23 Sep 2010
4.0.7333.3135
18 Nov 2010
4.0.7333.3231
13 Jan 2011
4.0.7333.3335
10 Mar 2011
4.0.7333.3414
05 May 2011
4.0.7333.3531
30 Jun 2011
4.0.7333.3628
25 Aug 2011
4.0.7333.3732
10 Nov 2011
4.0.7333.3822
09 Feb 2012