Friday 8 September 2017

Setting up your Dynamics 365 Online Portal


Dynamics 365 Online Portal Configuration


1) Go to Dynamics 365 Central Administration Center


2) Click on Application Tab


3) If portal Add – On is not configured it will show as point 2 and click on Portal Add-On and click on Manage button.


    4) It will redirect to “Configure Your Portal” page

Enter name, Portal URL and Select Dynamics 365 Instance


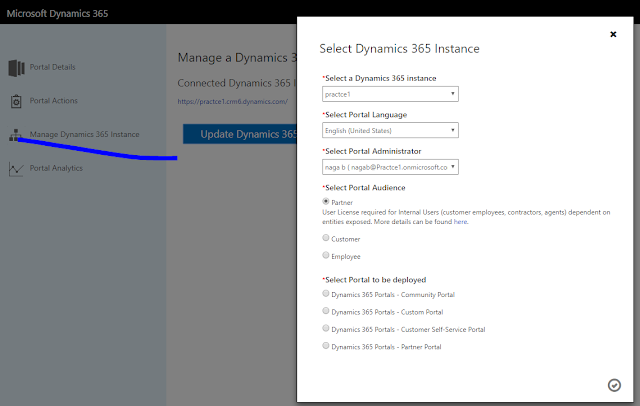
5) Then system will ask for Select Portal language, Portal Audience and Portal to be Deployed. Click on Submit button.


6) Prompt for Terms of Service and click on Accept button.

7) System redirected to below page and click on here after some time.

8) There will be another three left navigation buttons available in Portal Details page


9) Go to Dynamics CRM 365 and go to Settings >> Solutions, we can observe there are three manage solutions installed automatically for self-service portal.


10) There is new tile (Portal) appear in Site Map.


Tuesday 6 June 2017

Backup and Restore Dynamics 365 Instance


There are two types of backups available in Dynamics 365
1)     System Backups
  • ·        System backups occur daily
  • ·        System backups retained up to 3 days. Check your expiration date
  • ·        System backups do not count against storage limits.
  • ·        System backups are identified as created by System on the Backup & Restore Tab (Manage backups)


2)     On demand Backups
With on demand backups, you can make your own backup before making some significant customization change or applying a version update.

About CRM Managed on demand backups
  • ·        We can back up production and sandbox instances
  • ·        You can only restore to a Sandbox instance. To restore a production instance we need to switch it into a Sandbox instance
  • ·        On demand backups retained for up to 3 days. Check your expiration date.
  • ·        On demand backups are identified as created by some other name other than System and by presence of Edit, Delete and restore options in Details sections. System backups are having only restore option.


How take back up :
  • ·        Below are the steps to take on demand backup.
  • ·        Go to Office 365 and click on Admin tile
  • ·        Go to Administration Centers and click on Dynamics 365


  • ·        Click on Backup & Restore Tab


  • ·        Click on “New Backup” button.


  • ·        Enter backup name in Label and Description in Notes fields. Click on Create button.
  • ·        New backup is available at Manage Backups